Monday 28 September 2009

You Can't Fake the Funk

I just tried a bowl of Total Blueberry Pomegranate cereal. It tasted of neither.

There’s a growing trend in the flavor engineering field: Combine two or more fruits when describing the flavor, then use that to mask that your flavor matches no natural profile at all. Gone are the days when you simply knew things tasted fake. Now things taste weird, but you can mentally excuse that weirdness because it’s a flavor combination you’ve never tried before.

Probably the most common example is “strawberry kiwi.” If you’ve had a strawberry kiwi flavored drink, snack, whatever then you know that it tastes like the traditional fake strawberry only slightly off. If you’ve had fresh kiwi then you know that it doesn’t taste like the difference between regular fake strawberry and strawberry kiwi.

So, why is the fake junk industry doing this to us? Well, for one, we’re stupid and we buy this knowing it will taste like bullshit. We’ll ignore that for now. I suspect that the more important factors are either that it’s cheaper to make the incorrect flavor combination or it’s because the marketing for these combinations often implies that they are better than single flavor items.

Why would it be cheaper? Well, if you can spend a little marketing money taking a half developed fake flavor and telling someone that it’s really a combination of two, then you just saved half your development cost. Simple enough so far. It’s also likely that these flavors are developed using cheaper ingredients to keep costs low. Whatever the reason, I have a hard time believing that these companies are spending more money on these crappy, half-assed flavor combinations than they would on a decent singular flavor. Obviously it’s cheaper to create this crap in a lab than it is to, say, put real fruit in the mix.

It’s also marketed as premium. Maybe it’s a fly-by-night flavor that will disappear in a month to make way for the next totally new fantastic combination. Or, it’s the more-is-better-American-way. Perhaps it’s a combination that involves a premium fruit. It’s clear that manufacturers want us to believe that these are better.

Of course, they aren’t. They pretty much all suck. These combinations are often pretty decent when you get them from a better source. POM makes some palatable flavor combinations in their tea. POM tea in general is a little complex, but at least the flavors are somewhat realistic, if not always totally natural. Natural combinations are normally fairly decent.

When you’re in the cereal aisle or you’re buying from a major manufacturer you’re better to stick with the simple flavors. Better yet, go get some fresh fruit to go with your cereal. As for me, tomorrow I’m going back to plain shredded wheat for dessert.

Monday 21 September 2009

Fuck Yeah Breakfast Muffins

Before going GF, my favorite breakfasts were carby and sugary. Now, I love scrambled eggs but every once in a while I wish I had the convenience of grabbing something sweet to go. So, I made up these breakfast muffins that have good stuff in em to keep you going til lunch.

1- 1 1/2 cups of rice or soy milk
1 cup brown rice flour
2 apples (I used Honey Crisp)
1/4 c golden raisins
1 egg

3 T brown sugar
2 T oil
2 t baking powder
1/4 cup salted sunflower seeds

1/2 t cinnamon
1/2 t all spice
1 t vanilla

Mix all ingredients together. Bake for 17-20 minutes in 425 degree oven or until golden brown.

Thursday 30 July 2009

Turmeric-Paprika Pork Chops w/Couscous and Veggies

This was just a dinner I made randomly and it turned out really well, so I wanted to share it. Didn't take pictures of the cooking, just the final result... it's fairly simple anyway.

Pork Chops:

I just seasoned them with turmeric (mostly for color, but it imparts some flavor too), smoked Spanish paprika (hot style) aka "pimenton", a bit of toasted cumin and coriander, garlic powder, and Kosher salt/pepper. Just pat the spices on, don't rub it (that goes for all spice "rubs" BTW). Cook the chops in a pan with some olive oil over med-high heat for approximately 4-5 minutes per side, until they're firm to the touch. If you're suspicious of doneness and can't tell by touch, cut a small slice in the middle to see if it's still pink. It's worth mentioning that nobody's gotten trichynosis from undercooked pork in nearly 100 years, so I don't mind a little bit of pink in my pork (makes it jucier). I also suggest using an oven-safe pan to cook the pork, as you might want to stick it in the oven to finish if you're thinking it's underdone and don't want to burn the outside... this is especially true of thick-cut pork chops, but I just used standard boneless.

Couscous w/Orange Bell Pepper and Onion Saute:

I used a boxed organic couscous (forget the brand) that essentially just requires that you mix the couscous into boiling broth/water (along with olive oil, butter, and/or salt, if desired), cover, remove from heat, and let sit for 5 minutes. I used some leftover homemade chicken broth I had in the fridge, salt, and a bit of olive oil. When it's sat long enough, just fluff it with a fork. This isn't the traditional/bad-ass way of making couscous (it's traditionally steamed), but it comes out tasting fine and is a VERY easy whole-grain to prepare along with practically any dish.

Then I topped it with some sliced orange bell peppers and onions that were sauteed with some minced garlic and simply seasoned with salt and pepper.

Asparagus:

This is how I cook pretty much every piece of asparagus in my house. Blanch the asparagus in generously-salted boiling water after trimming off approximately 4" of stalk. Let it go for about 2 minutes or until you get to its desired doneness (I like mine crunchy still) -- remove it to an ice bath (ice + water + salt) and let it cool so it stops cooking. When you're ready to use it, either serve it cold or put it in a saute pan with some butter (and garlic if you like) to heat it up and give it some nice flavor.

Here's the final product (2nd picture also features a Dogfish Head 90-Minute Imperial IPA, which is an absolutely AMAZING beer)... note the nice yellow color the turmeric imparts:


Thursday 23 July 2009

Apple Tarte Tatin

So this was basically my first time trying anything beyond a basic pie. I've made my own crust previously for a quiche, but had never made an entire semi-complicated pie from scratch before... was pretty proud of myself. I used Jacques Pepin's recipe in "Complete Techniques" (great book BTW) as a starting point but didn't follow it exactly. Here's the recipe/technique I used:

Apples:

6 Braeburn apples -- you could certainly use green apples, and they'd probably be a little crisper by the end, but I'm a red apple fan, and Braeburns don't have a ton of juice so it kept the crust nice and crispy.
1/3 C white sugar
1/2 stick of butter
Dash of cinnamon for seasoning

Slice the apples as thinly as you can while making sure they're complete cuts and fairly uniform. I slice the apples in half twice (along the core, then the remaining sides) and then use the flat cut side as a base for slicing. If you have a mandolin, do it that way and it will be faster. Melt the butter until it is foaming, then add the apples, then the sugar.


You only want to cook the apples enough for them to be coated in the sugar/butter mix and slightly tender... they have nearly 45 minutes of cooking ahead of them, so don't get them mushy. I sprinkled a little cinnamon over them after removing them from the pan to a cookie sheet lined with wax paper. you want the apples to be at least room temperature (or colder) before trying to arrange them. Make the caramel while the apples are cooling to save time.

Caramel:

1/3 C sugar
Water

This is where I diverged from Jacque's recipe a bit... instead of using simply water and sugar for the caramel, I used the remaining cooking liquid from the apples, which is a nice sweet apple butter that I thought would add some additional apple flavor. So anyway, I added the sugar all at once to the remaining juices and then added water periodically when I noticed it reducing too quickly.

Cook the mixture while stirring constantly to avoid clumping or burning. The mixture will look like this for quite a while (I had it on med-low heat, but it would go faster over medium):


Keep cooking it (raise the heat if you want to, but be careful not to go too crazy) until you get a nice golden brown like this:


After cooling the apples, pour the hot caramel into the pie plate, moving it around to distribute it as well as you can around the bottom of the plate and a bit of the sides. Now, arrange the slices as precisely as you can on the pie plate -- remember that the bottom will the be the top, since tarte tatin is an upside-down tart, so the curved part of the apples should be on the bottom. Start from the center and arrange them in an overlapping circular pattern, working your way towards the outside of the pie plate. Once you reach the edge, start from the middle again. Any small or broken pieces of apples can be effectively hidden in the middle of the tarte, so save the nicest ones for the first layer on the bottom and for the sides. Anyway, this is what mine looked like after loading it up with all 6 apples and the pieces:


The apple and caramel portion is ready to go, now onto the crust:

Crust:

2 C AP flour
1.5 sticks of butter (6 oz.), cold and cut into small pieces... or you could use half and half and use lard or vegetable shortening
1/4 tsp salt
1/2 tsp sugar
1/3 C cold water (amount varies)

Add the butter to the flour (which should be tossed with the salt/sugar) and either use a pastry cutter or "pinch" the butter winto the flour until it resembles corn meal. If there are some larger butter chunks left, that's no problem.. just makes it flakier.


Add the water bit by bit until you can softly knead it into a workable ball. KEep oin mind that the less water you use, the softer the crust will be, as water and additional kneading develops gluten. Flour a counter/cutting board and roll the ball out, turning 1/4 turn each time. Once it's about 1/2" thick or so, place the crust on top of the pie plate and pinch the edges to seal -- make sure to push the dough down onto the apples so there isn't an air pocket before sealing. Trim the dough (I used a pizza cutter) so it just hangs over the side of the pie plate.

Brush the crust with an egg yolk and cook in a pre-heated 400-degree oven for approximately 45 minutes. Keep an eye on it late in the cooking, as it could possibly boil out all your oven or burn in a matter of minutes. When oyu take it out, let it sit for about 5 minutes, but remove it fairly quickly, as you don't want the caramel to re-solidify. Place a platter on top of the crust and flip the pie plate over. I managed to flip this one with only a single apple falling off, which I was extremely happy about. Here's what it looks like all done and steamy:


Thursday 16 July 2009

Quinoa Salad

Quick lunch or side dish that can be served hot or cold. Keeps well in the fridge :) This is a super basic recipe that is very forgiving to all sorts of tasty ad-ins: kalamata olives, chopped walnuts, sun dried tomatoes, artichoke hearts, hearts of palm, etc.

1.5 cups quinoa
2 cups Kitchen Basics veggie stock
2 roughly chopped ribs celery
1 can of Trader Joe's Tongol tuna
Handful of golden raisins
1 tsp Herbs de Provence
1 TBP olive oil
1/2 tsp garlic powder
1/2 tsp onion powder
1/2 teaspoon of balsalmic vinegar
Healthy grinds of sea salt + pepper to taste

Pour your stock into a saucepan, add the quinoa, raisins, herbs, onion/garlic, vinegar, oil, salt/pepper to taste. Give it a quick stir, turn the burner on medium until it barely reaches a boil, reduce heat to simmer, cover and wait 10-15 minutes or until almost all of the liquid has soaked in.

After the elapsed time, chuck in your celery, turn off the heat and put the cover back on. Keep covered until all the liquid has been absorbed and the celery is fork tender (don't over cook!! its better to have very crunchy celery than mushy!)

At this point you can either throw the tuna in and serve warm or take the pot off the stove, transfer to a large bowl and refrigerate until cold. Once cold, throw the tuna in.

Garnish with fresh basil.

Suck It, General Mills.


Maybe you have wandered around in the cereal aisle lately and discovered that Chex now has several "Gluten Free" varieties. Well, I have a bone(r) to pick with you, General Mills and many other manufacturers who seem to have it in for my intenstinal health.

To be truly gluten free, you must manufacture in a dedicated GF plant where there is no chance of cross contamination. The finished product must be routinely checked for gluten.

"Gluten Free!" has become the latest catch phrase that has been misunderstood as a health fad. This isn't some low-carb, vanity diet that will eventually fizzle out and die. This is so we don't wind up shitting into a colostomy bag because we got colon cancer due to eroding our digestive tract. There is a big different there.

Big businesses aren't invested in our health, they are invested in our pockets and tapping into a previously ignored segment of the population who is used to paying insanely high prices for specialty foods (seriously, I've seen $16 for 2 premade GF pizza crusts..)

In conclusion, you, General Mills can suck it and suck it hard. Or soft, whichever you prefer as long as you suck it.

Wednesday 8 July 2009

Argentine Empanadas

So I'm completely in love with making my own dough lately. It all started with the Chinese dumplings, then it moved to Southern biscuits... but now I'm on the empanadas hard. Here's the recipe I used for my latest batch, which had spicy beef picadillo, potatoes, and goat cheese (amongst other things). In all, it takes a few hours, but you get a bunch of them and if you tag-team with someone else, I'm sure it would go much faster. You can use almost whatever you want in empanadas... Argentine food is famous for its Italian influences, but you can pretty much put anything you like inside these delicious little pastry packets. I made some vegetarian ones with Italian vegetables, and I plan to make some with chorizo and potatoes soon.

Dough:

1.5 C All-Purpose Flour
4 tbs fat (I used all butter in one batch, half lard/half butter in another)
1 egg yolk
1/2 tsp salt (I used Kosher)
~3/4 C milk

The easiest way to do this is in a food processor -- just pulse the flour and the fat together until it looks like cornmeal.. if you've made biscuits or pie crust, you're familiar with this. Add the egg yolk and a bit of milk then pulse to combine. Keep adding milk in small increments while pulsing until the dough begins to pull away. Once it will hold together when you lightly knead it, it's ready to go. Form the dough into 2 or 3 thick discs and chill in the fridge for 30 minutes or until you need it. Cover it with plastic wrap or in a covered container if you plan to leave it for longer than a few hours though.

Note on this recipe: normally empanada dough doesn't have milk in it, but apparently they make them this way in the Mendoza region of Argentina and it makes a fluffier final product. I decided to try it out and really liked the texture. You could also use water, which I might do for my next batch to see if I can get some fairly crispy as a change of pace.

Roll out the dough as thinly as you can (right before it's transparent, about 1 mm) and cut out rounds with the instrument of your choice. I used an oatmeal canister top, but it just depends on what size you want. Re-roll the scraps until you have one final awkward looking one remaining, which you will eat as soon as it comes out of the oven. Chill the dough rounds until ready to use.. sooner the better though, as you don't want it to get dry.

Filling:

1 lb ground beef
2 white onions, diced finely
1 bunch green onions
4 potatoes, peeled then boiled in salted water until fork tender
3-4 garlic cloves, minced
2 tbs ground chile powder (chile molido)
1 tbs cumin, preferably whole toasted and then ground
Fresh oregano and cilantro, chopped
Smoked paprika to taste (if you have it.. I didn't, unfortunately)
Salt/Black pepper

Cook the onions until translucent over medium heat (salt them to facilitate sweating), then add the beef, smashing/stirring it with a spatula to break it in to small pieces. Add the garlic when the beef is about halfway done to prevent burning, then add the spices and finish cooking the beef. Remove the beef mixture with a slotted spoon and combine with the potatoes, which should be diced up small and then mashed in with the beef. Add diced green onions, cilantro, and oregano (to taste). Put everything in the fridge to chill after tasting for spice levels (I added more salt due to the potatoes and also some extra chile molido).

Assembly:

Spoon a medium spoonful of filling into the center of your dough. I made this batch with goat cheese stuffed inside, so I did about 50% here with the goat cheese loaded in the spoonful:


Then topped it off with a packed disc of filling to prevent the cheese from oozing all over the place:


Now here's the fun part. I made an exceedingly crappy video trying to show my technique, but it was tough to do while holding the camera. Anyway, you want to brush the edge of half the dough with egg white, basically pinch together the two ends of the dough (like a taco), then close it up from edge to edge, being careful of filling getting in between the dry dough and the egg white side. Then you should do another seal with the side of your hand as seen here -- this creates a nice bump as well as a bigger rim, making an ornate sealing method easier.


I fold the ends over and then pinch the dough to seal it and make a nice looking empanada -- you could also just use the tines of a fork or fold it.. whatever works and keeps it sealed:


Let the empanadas rest in the fridge for another 30 minutes before baking. Pre-heat your oven to 350 degrees, then brush the empanadas with egg yolk and sprinkle with salt (again, Kosher or sea salt is much better for this kind of thing). I did this on a wax paper lined sheet pan that would be used to bake them as wlel -- parchment paper is probably better, but I didn't have any:


Bake at 350 for approximately 20 minutes. But really, just wait until they're slightly brown and totally firm and you're good to go.. I think mine took 24 minutes. Yummy:


Enjoy with a quick blender chimichurri with whatever fresh herbs you have on hand (basil, parsley, oregano, cilantro all work well), olive oil, vinegar (white or balsamic works), garlic, onions (if desired.. they'll be raw white onions), chile powder, and salt/pepper.


I'll probably post the technique video even though it sucks. Or maybe I'll just make more of these delicious little bastards and shoot another one. Enjoy!

Thursday 30 April 2009

Best Scrambled Eggs EVA

Scrambled eggs are THE BEST! I always want them for b'fast or after a late night...

Here is an easy recipe for the tastiest scrambled eggs:

- 2 to 3 high quality eggs, preferably local/ organic/ free range
- 1 teaspoon good quality olive oil

If making an even number of eggs, use half whites only and half whole egg. When I make 3 eggs I use 2 whites and one whole.

Crack your eggs in a wide mouth bowl, pour in the olive oil and whisk the crap out of them until frothy- usually two minutes. Make sure the yolk is fully incorporated and there are no blobs of egg white floating around.

Eggs like to be cooked "low n' slow"...so don't use heat above medium-low. Cook for 3-5 minutes or until there is no liquid, but don't over cook them so they become spongey. Gross.


Eat solo, or put in a tortilla with melted cheese!

Thursday 16 April 2009

Curried Mussels with Spiced Bacon

Yeah, so bacon is pretty much my favorite thing to add to other things, and I was feeling like curried mussels a few nights ago. Here are the results, which turned out very well:

2 lbs of mussels (normally that's what the bags weigh)
1/2 can of coconut milk (more if you want more broth -- I had some broth left over though, so 1/2 can should be plenty)
2 stalks of lemongrass
1/2 white onion
1 shallot, diced thin
3 cloves of garlic, minced
1 tsp minced ginger (more to taste)
white wine
6 slices of bacon
Curry Powder
Coriander

To make the broth, just saute the onion, garlic, shallots, lemongrass (remove the outer layers and chop big pieces of the pale yellow/white bulb area), and ginger in a wok or a deep saute/fry pan -- just get them to the point where they're fragrant, 2-3 minutes. Add the spices, cook for another minute, then add the coconut milk. Stir everything together, cook for another minute or so, and then taste to see what the spices are like -- I ended up adding about 1 tbs of curry powder...

Note on curry powder vs. paste: I used curry powder (yellow), but if you wanted to use paste, you could certainly do that as well -- I wanted to have a lighter curry taste since mussels are delicate, so that's why I opted for the powder. If you're using paste, add it before adding the coconut milk, and then cook the combined mixture a bit longer until you see the oil separating and coming to the top of the broth.

"De-bearding" mussels: Mussels are mostly farmed these days, which is great because they are very sustainable and there is little to no difference in taste between quality farm-raised mussels and wild ones. The farmers hang ropes seeded with mussels into the water, and then the mussels attach themselves via a strand of calcium coming from their shells -- this is the "beard", and you do not want to eat it.

This picture is not mine (got it here: http://www.flickr.com/photos/86571141@N00/81767631/), but it shows the beard and the method of removing it:

Anyway, as shown, you want to pull the beard towards the hinge end of the mussel, as this will prevent an untimely death by yanking the mussel from its shell. I always use a dry towel, as it gives a much better grip than your fingers, and some of the beards can be quite tough to remove. It took me about 15 minutes to de-beard 2 lbs. of mussels, though most of them were relatively clean... so plan ahead a bit on dinner time.

Also (important!)
, never eat any mussels that are open, have cracked/broken shells, or smell noticeably bad -- sometimes they are a little bit open at the ends, but if you tap on the shells or force them closed, they should hold tight... this indicates that the mussel is still alive and not a festering bacteria haven waiting to kill you.

Okay, now that's out of the way -- back to the recipe:

For the bacon, I cooked it on a sheet pan in a 350-degree oven for about 20 minutes. Just check on it -- when the tiny white bubbles are out in abundance, remove the bacon and dab it with a paper towel to remove most of the grease. I seasoned my bacon with curry powder and coriander before baking it, and it tasted wonderful... plus, the neon yellow bacon grease was kinda cool.

When the curry broth is combined and seasoned as you would like, add the mussels to the pan, then move them around in the pan with a spoon, making sure to coat them with the broth as much as possible. After they cook for a minute or so and the broth comes back up to temperature (might want to raise the heat a bit), add the wine (I used two big "glugs" of white wine), and cover the pan to help the mussels steam.

Mussels are done when they open completely -- you can check on them without disrupting the cooking process too much, but generally they will be done in 5-6 minutes of cook time. Any that aren't open all the way, cook a bit longer -- if they still do not open, then do not eat them.

Here's what it looked like by the end (I added the bacon towards the end to keep it fairly crisp):


Serve with some crusty bread (or rice, if you're so inclined.. it is curry after all) and some nice white wine/prosecco/rice wine. In all, (not including de-bearding time), it took 20 minutes to make this meal and the total cost was about $10 -- the mussels were $7.98 for the bag at my fish market, and everything else was just veggies... very nice meal for that amount of cash if I do say so myself.

Viva la mussel!

Wednesday 11 March 2009

Yay for you, Trader Joes.

Trader Joes has GF baking ish now. It all started with some pancake/ waffle mix (which I tried and it was very good! It can double as GF flour for cakes and cookies, too) and I noticed last week that they now have brownie mix.

I gave the brownies a shot- added some extra chocolate chips and walnuts, but it was still lacking in the taste department. Maybe it was because I used applesauce instead of oil, but there just wasn't a depth of flavor. They just weren't chocolately enough. I'm sure it could be remedied by adding more cocoa, and I think I will give that a try next time around.

They did have a really great, chewy texture. The edges got crispy and caramelized...the best part of a brownie in my opinion. And if you're like me, you will appreciate this brownie pan which can be found at Fredflare.com:

Monday 23 February 2009

lobster

I have to cook a lobster dinner on Wednesday. It's something I've never done. Any tips or advice? I'm thinking of getting three pounds for three people and boiling.

Wednesday 11 February 2009

Butternut Squash Soup

One quart of stock
Two smaller butternut squash - about 1 1/2 lbs. (cubed) [I recommend two smaller ones rather than one large one cuz their flavor is better when smaller]
One carrot (diced)
One celery stalk (diced)
One medium onion or leeks (diced)
2 Tbsp. Butter or olive oil
One bouquet garni (same as the potato-leek one)
1/2 c. cream or creme fraiche (optional)

1. Add the fat (butter or oil) to the soup pot. Add the diced veggies and sautee until they have softened (about 5 minutes).
2. Add the squash, stock and bouquet. Bring to a boil and let it roll for about 30 minutes or until the squash is soft enough to slide a fork in without resistance.
3. Again, you can either eat this as is or you can puree it. If pureed, return to the pot and add the cream if you desire. Serve as soon as possible.

Potato Leek Soup

A quart of stock
A pound of russet potatoes
A pound of leeks (one large or two smaller ones)
2 Tablespoons butter or olive oil
A bouquet garni [I use a coffee filter tied off with some twine]
Salt & Pepper
1/2 c. white wine (optional)
Cream or creme fraiche (optional)

For the bouquet:
2-4 Bay leaves
4 sprigs of thyme
some peppercorns

1. Melt the butter/add oil in the soup pot. Add cut up leeks - about 1" wide sliced in half so its not a bunch of leek tubes, rather inch-wide strips. Sautee the leeks until wilted - about 5 minutes. If you are using the wine, add it and bring to a boil until the alcohol is cooked off.
2. Add the stock and bouquet and cut-up potatoes and salt/pepper. Bring to a boil.
3. When the potatoes are cooked all the way through (about 20 minutes), drop the heat. Remove the bouquet.
4. Here is where you can either eat it here if you want a "rustic" soup experience, or, if you have access to a blender, pour in the potatoes and leeks and some broth and puree the whole mess (probably in stages and dont forget to hold down the lid!).
5. Return the puree to the pot and add the cream if you want it a rich soup. Otherwise you are good to go.

Tuesday 27 January 2009

Whorehouse Arizona Treats


Saturday, I went to see the Kings of Leon play at the House of Blues in Chicago for a very special show benefiting pediatric cancer research. Knowing that 1) I would be indulging in copious amounts of vodka tonics 2) Would be spending the night at a hotel 3) Would be wanting some form of junk food around 1am, so I made these GF rice crispy treats.

Although they were extremely magical tasting, they did not bring me any magical powers to get the band to impulsively play Arizona or play me a game of bowling at 10 Pin...


5 cups of RICE CHEX -they are gf, Rice Krispies are not!!!
1 bag of marshmallows (read the label for any hidden gluten jerks)
1/2 stick of butter
2 t vanilla

In a large pot, slowly melt the butter, vanilla, and marshmallows- setting one cup aside for later.

When the mixture is smooth, add the rice Chex, coating all pieces.

Quickly add the last cup of marshmallows to the mix, folding several times, and transfer to a buttered baking dish to set for about 20 minutes.

Now go stand up to a giant, say that you're a fighter... too drunk to remember. Too drunk to... weee ne ne ne neeeee, weee ne ne ne neeeeee, weee ne ne ne ne.

Two In One GF Cookies


If you're like me, you like variety. You can't commit to making one type of cookie, and GF cookies are like $5+ a box. Bogus.

I have developed a plan of action; this recipe can be altered in a few different ways, so play around with it and see what you come up with. This particular installment is for GF Chocolate Chip and GF Spice cookies.


You'll need:

1 cup Pamela's Favorite Sandwich Bread Flour
1/2 cup brown rice flour
1/2 c coconut
1/4 cup potato starch

1/2 stick of butter
1/4 cup of olive oil
1/2 cup of packed dark brown sugar
2 T vanilla extract
1 t baking soda
1 t xanthan gum
1 egg
pinch of salt
chocolate chips for garnish

For Spice cookies include:
1 t ginger
1/2 t all spice
1/2 t nutmeg
a few grounds of fresh black pepper (depends on how spicy you like your cookies!)
crystallized ginger for garnish

Pre-heat oven to 350.

Mix butter, coconut, egg, vanilla, sugar and oil together in a bowl until creamy. In another bowl, combine all of your dry ingredients and then slowly pour them into the wet mixture, beating until it looks like "regular" cookie batter. GF baking is really dependent on weather conditions, so if its really dry outside, you may find you need to add more flour (rice or Pamela's) until it looks correct.

With 2 large spoons, drop 2" round balls onto a non-stick cookie sheet. You should not fit anymore than 12 cookies. With your chocolate chips, press a few onto each cookie.

Pop in the oven for about 5-7 minutes or until just beginning to brown (still yields to touch).


With the left over batter, dump your spices in. The dough will look like this:


Space your cookies thusly (yeah, I took that term from Alton Brown, so what...) and sprinkle a little of your crystallized ginger on top:


And here is your highly delicious final product; a chewy, soft, very spicy cookie that your gluten eating counterparts will gladly enjoy. They probably won't know the difference. I play that trick on my friends all the time...

Monday 26 January 2009

Pork Dumplings

So this was actually my first true attempt at making my own dumplings. I have made them twice previously, but it was using store-bought skins, and I wasn't all that happy with the final results. So I decided to make them entirely from scratch this time. I actually made some shrimp siu mai also, but I'm going to wait to post that one until I refine the recipe a bit. I was extremely happy with the way these pork dumplings turned out though, so on to the recipe:

Wrapper:

2 cups all-purpose flour
1/2 cup of water
dough for rolling surface

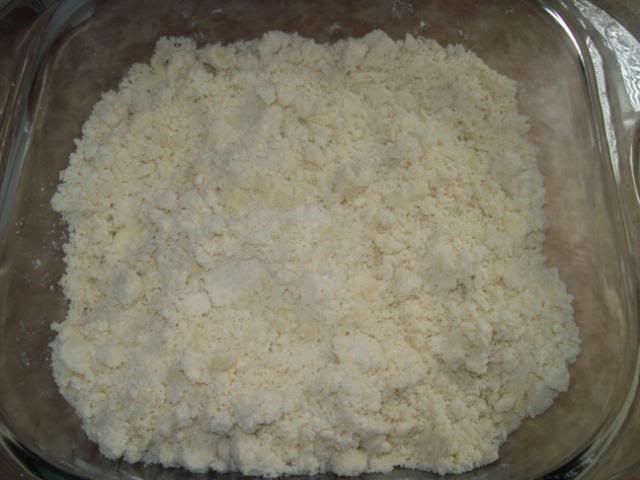
You could probably do this in a food processor (or a big mixer if you're a bad-ass and actually have one at home), but I went with the old Asian lady way and made the dough by hand. Add the water to the flour and just work it until it begins to pull away from the bowl. When it does, start adding about a teaspoon of water at a time, working it until it's a somewhat sticky ball. Flour the outside a bit and let it sit at room temperature for 15 minutes or so to rest. IT should look something like this (I like how it glows):


The pork filling (measurements aren't exact because the batch was very large and I didn't measure everything before adding -- it really does depend on how much of each thing you like anyway):

1 lb ground pork (I ended up with 1.41 lbs because that's what they had packaged)
1 cup minced white mushrooms (could use shitake also)
1/4-1/2 of a regular cabbage (napa is best, but my market was out)
1/2 cup chopped Anise Root (or celery)
1 minced jalapeno
1/2 to 1 full package silken tofu (more on this later)
2 bunches diced green onions, about 1 1/2 cups
1 tbs minced ginger
2 tbs dark soy sauce
2 tbs Hoisin sauce
3 tbs rice wine vinegar (to taste)

It'll look like this:
Mix everything together -- make sure to break up the silken tofu so there aren't any pieces left. The whole point of the tofu is to keep everything really moist, but it also seemed to help bind everything together when the dumplings were cooked, giving them a meaty but smooth texture that was really nice. I can't take credit for this innovation, some lady in NYC who beat Bobby Flay's ass on Throwdown used it in her dumplings, so I shamelessly stole it.

This will be enough filling for about 50 dumplings, probably more depending on how large you make them. On that note, get yourself something to drink, because you'll be here for a while...


Making these was much easier than I thought it would be. The first few attempts were a little thick-skinned, but I got the hang of it despite using a Tapatio bottle to roll them (wasn't bad actually, good for a small workspace). You'll want to portion out the dough in little 1.5" x 1.5" balls/squares Form them in your hand by pressing with with 3 fingers of your off-hand -- you want them to be little football or oval-shaped blobs, a little thicker in the middle than the edges. Flour your surface for each dumpling (seemed like the best way to keep them from absorbing too much of it) and roll them out to about 1/8" - 1/4" thick at the edges.

IMPORTANT: The center of the dumpling should be thicker than the sides when it's rolled to its final size. This is to ensure that there's fairly even dough distribution after the dumpling cooks and expands a bit. This is also a failsafe to ensure that the bottoms won't break on you while you're cooking them. The best way to do this was to roll the whole thing out to about 1/2 in. then concentrate on the sides, stretching the dough out to about 3" x 3", like this:
Assemblage:

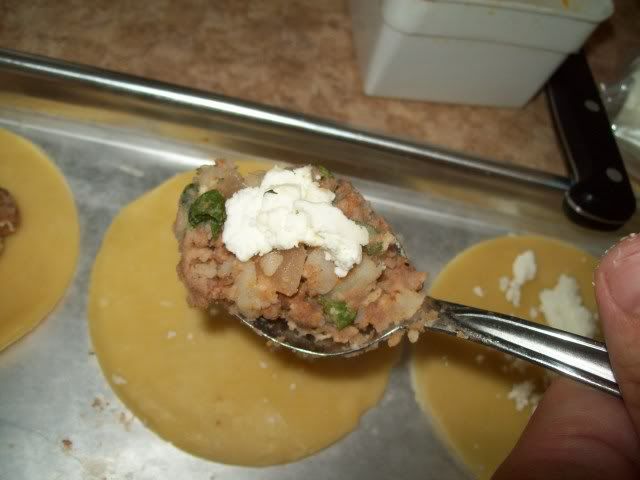
Place a very large teaspoon of filling into the center of the wrapper
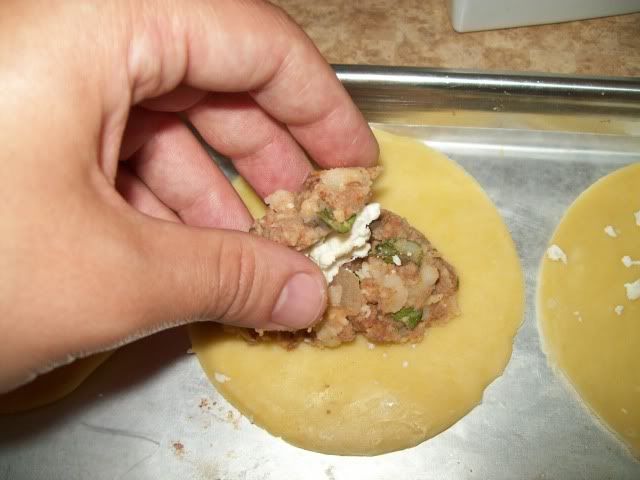
Fold the wrapper in half like a taco, pinching the dough together at the top -- make sure not to tear it
Crimp the dough from the middle out to the edge, and then seal the ends off

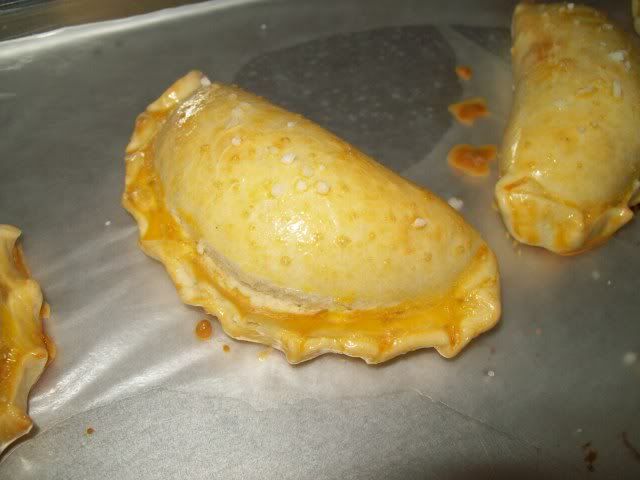
Here's what they should look like when they're all closed up and ready to go:


You can cook these dumplings several ways: put them in a regular steel steamer, do them in a bamboo steamer on a bed of greens (cabbage or chard works well), or boil them. But my favorite way is to make them potsticker style by combination frying/steaming them. So here's that method.

Heat some vegetable oil on medium-high in a thick skillet -- you want it to immediately sizzle when you put something into it (good test is to pinch off a bit of dough)
Place the dumplings in the skillet bottom-down, making sure to give each one space so they don't stick together
Cook for 3-4 minutes on this side, then turn over to another side (whichever lays the flattest), cook another 3-4 mintes on the other side


When both sides are fairly golden, hit the pan with 1/2 cup of water ALL AT ONCE and then immediately cover with a tight-fitting lid (watch the hell out, there will be spattering and hissing)
Let the water cook off, it took me about 8 minutes, but listen for the sizzle to change from water back to a more dry sizzle (NO PEEKING!)
Uncover and let the rest of the water cook off.. after it's gone cook for 1-2 minutes
The dumplings will crisp again as the water cooks off, but you might need to flip them once more to make sure they don't burn. They may stick (hence the name), but just try to jab them off with some tongs or a spatula without tearing the skins

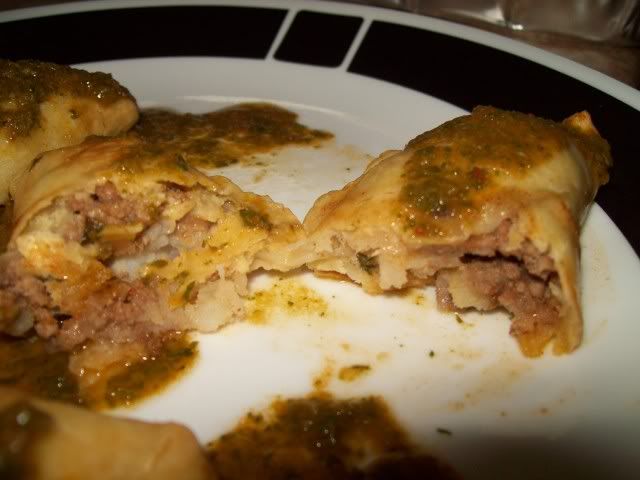
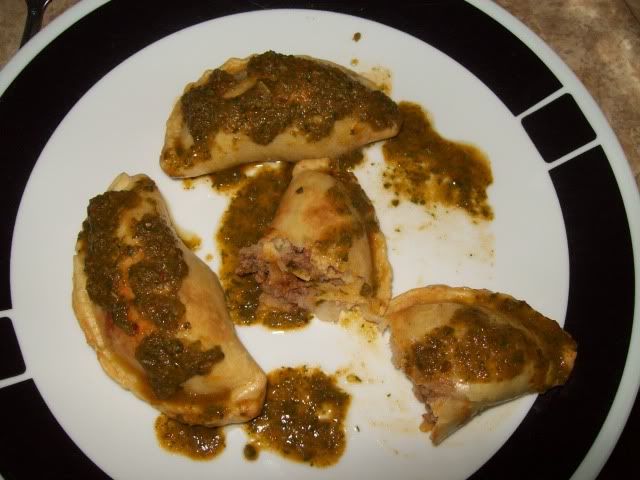
And blammo, delicious dumplings:


Dipping sauces are as easy as you want to make them. You could do 2 parts rice wine vinegar to 1 part soy sauce and 1 part water with a little brown sugar to sweeten the deal -- that's probably the most classic sauce for these. Here's what I did since I like things spicier and more fish sauce-y:

1/4 cup rice wine vinegar
2 tbsp soy sauce
1 tsp brown sugar (dissolve in hot water)
pinch ginger powder
dash sesame oil
dash fish sauce
1 tsp chili-garlic paste
1 squeeze Sriracha
2 tbsp water

Adjust to taste -- some soy sauces are really strong and salty so you have to dilute them more to avoid sodium shock.


In all, this took me about 3 hours, including the time making the shrimp ones that will debut at a later date. I ended up with about 20 shrimp dumplings and 20 pork with this recipe, but I have a ton of leftover filling and plan to get up to about 100 total. If you plan to make 100 or so, I'd do 8 cups of flour for the dough, and about 1.5 lbs of pork, and then get to work, as there should be enough filling for that many.

I actually will be freezing the majority of these -- you just want to pre-freeze them on a plate with wax paper on it then put them into a freezer bag. You'll just need to cook them a little longer to ensure that the filling is cooked through, but the methods are the same and they'll taste great. It seems like a metric shit-ton of work, but it goes quick once you get the dough and filling prepped, and they're definitely worth the effort, especially since they have longevity.

How can you say no to this face?

Monday 19 January 2009

Vegetable Stew With Quinoa

2 cans tomatoes (I used Italian-style with herbs, doesn't matter though)
1 can corn
1 can green beans
1 can white beans (Navy beans will work, but Northern White or "White Beans" are the best because they're a little bigger and hold up to cooking)
1 zucchini
1 cup celery root (or regular celery)
1 cup diced onion
1 cup diced baby carrots (cut them on a bias if you want big thin pieces)
1 1/2 cups of quinoa (rinse it to be safe... most boxed will be fine, but definitely rinse bulk quinoa with cold water in a mesh strainer)
2 cloves garlic
1 box (16 oz?) vegetable or chicken broth
2 bay leaves
1/2 tsp onion powder
1/2 tsp garlic powder
dash of oregano and basil

  • Sautee the onions, garlic, celery root, and carrots for 2-3 minutes in some olive oil (with a crock pot, you could just throw them in there, but I really like the onions sauteed because it imparts more flavor)
  • Add the tomatoes, broth, quinoa, and spices -- let it come to a boil and then reduce the heat
  • Add the rest of the veggies, let cook for 30 mins or so (basically just to make the zucchini tender)
  • Remove the bay leaves, and serve with some crusty bread

You could add chicken to this easily (buy a rotisserie chicken and shred it up, or just use diced cooked chicken breast). You could also sub the veggie/chicken stock with beef, throw it in a crock pot on low, and add cubed steak or a roast (sear it in the pan first for more flavor and better texture). Of course, you could use fresh or frozen veggies, I just happened to have everything in cans this time.

Here's the late-arriving pic of the finished product, complete with some shaved Parmesan on top:

Monday 12 January 2009

Classic White Layer Cake with Chocolate Buttercream Frosting

For my friend's birthday, I made him a traditional white layer cake with a chocolate buttercream frosting, and it turned out great so I figured I would share it. I got the cake recipe from Baking Illustrated from the Cook's Illustrated people and the chocolate buttercream was adapted from A World of Baking by Dolores Casella. Since he is a big Green Day fan, I re-created the cover of American Idiot with powdered sugar and red frosting. Here we go. (Note: t = teaspoon, T=tablespoon)

Cake:
2 1/4c. Flour (all-purpose or cake)
1 c. milk (room temperature)
6 large egg whites (room temperature)
2 t. almond extract
1 t. vanilla extract
1 3/4c. granulated sugar
4 t. baking powder
1 t. salt
12 T. unsalted butter (softened, but cool)

1. Preheat the oven to 350 and grease your 9-inch cake pan(s).
2. Mix the egg whites, milk, and extracts in a bowl or 2-cup measuring cup.
It will look something like this:
Photobucket
3. Mix flour, sugar, baking powder, and salt in a mixing bowl. I recommend finding aluminum-free baking powder like Rumford's:
Photobucket
4. Add butter to flour mixture and mix well until the mixture resembles fine crumbs.
It should look like this:
Photobucket
5. Add all but 1/2 cup of the milk mixture and beat 90 seconds in a stand mixer or 120 seconds with a hand-held mixer. Scrape the sides of the bowl and add the remaining milk mixture and beat another 20 seconds. It should look like this:
Photobucket
6. Divide the batter evenly into the cake pans. If you only have one one cake pan, scoop about 3 cups into the pan, as the mixture totals about 6 cups. Make sure you spread the batter to the edges of the pan and smooth the top. Bake until you can stick a toothpick in and it comes out clean, about 22-25 minutes. They will look like this:
Photobucket
7. Let them sit in the pan for a few minutes then invert on a rack or a clean surface. Make sure you are gentle with them, as they have a tendency to break apart if not fully supported. Let cool fully (about 1 hour). Then you are ready to make the frosting.

Frosting:

3/4 c. softened butter (or margarine)
2 3/4 c. powdered sugar
1 large egg or 2 egg yolks (the yolks make it a bit richer)
Generous 1/3 c. baking cocoa or 3 squares of melted unsweetened chocolate
1 t. vanilla extract or rum or whatever flavoring you would like
1/4-1/2c. half & half or cream (optional)

1. Cream the butter or margarine. It will look like this:
Photobucket
2. Add powdered sugar and mix thoroughly.
3. Beat in the egg, chocolate or cocoa, and flavoring.
4. If you want it thinner, add some half and half or cream.

The frosting should look like this:
Photobucket

Now, time to frost it up!

1. Place the first layer upside-down on your serving surface.
2. Put a large dollop of frosting on the top (bottom) of the first layer and spread it out to the edges.
3. Place the other layer on top (again, upside down) and dollop a good amount of frosting on top and spread it to the edges. Like so:
Photobucket
4. Now, scooping out a little frosting at a time, spread the frosting on the sides of the cake, making sure that is it is totally "sealed." Smooth the frosting out, and if desired, go over it with a hair dryer on hot to give it that glossy, professional look. Here is the undecorated cake and the final presentation with the cover art on it:
Photobucket

Photobucket

Meet The Cooks: Creme Fresh!

I'm a student in his late twenties, residing in St. Paul. I enjoy cooking, but baking is my love. Most of my posts will be of the baking variety, but I'm sure I'll add some good cooking recipes and even a review or two. I'm generally drawn to things that look challenging, so some recipes may have a bunch of ingredients or strange methods. Usually there is a way to simplify them, and I will make every effort to point out where that can happen. I hope you enjoy the recipes that I share, and I'm always on the lookout for something new to try out.

-Logan aka Creme Fresh! aka RealJustice

Sunday 11 January 2009

Beef Burgundy

this how I like to cook Beef Burgundy, aka Beef Bourguignon. it's a somewhat time consuming dish, but it is delicious, especially this time of year. it also can be frozen in small batches and easily reheated for a quick meal. my recipe is a combination of a family recipe and internet recipes.

you'll need:
2 to 4 pounds of beef
half to one pound bacon
one or two bottles of burgundy or pinot noir
fresh parsley
fresh thyme
fresh sage
bay leaves
black peppercorns
onions
pearl onions
carrots
garlic
chicken or beef broth/bouillon
cheesecloth
potatoes, egg noodles or couscous
a good dutch oven or stockpot


you're going to need some beef. two to four pounds of sirloin or chuck roast will work. cut into 1 1\2 to 2 inch pieces and place in a bowl. add a cup or two of burgundy/pinot wine and chopped fresh parsley. marinate overnight or two hours if you're in a hurry.

when ready to cook, cut bacon into one inch chunks. fry in skillet til crispy. put in pot. drain most of the grease. beef should be at room temperature with parsley removed. season beef with salt and pepper and brown in the skillet with grease and remove to the pot.


then brown carrots in skillet and remove to the pot. deglaze pan with some wine and pour into pot. chop an onion and put into pot. add half to one bottle wine and bouillon until covered.

using a cheese cloth, wrap spices, garlic, peppercorns and an onion. place in liquid.


cook at 325 for 3 to 5 hours, stirring occasionally. meat is done when a fork easily slides into it. remove to stove top.

cook pearl onions in butter and water in a covered skillet. remove and add to the pot. cook on the stove 10 to 15 minutes.

squeeze juice out of cheesecloth bundle and discard. remove all the meat and veggies from the liquid and place in bowl. on the stove top, reduce the remaining liquid in the pot by nearly half. add meat and veggies back and cook another 15 minutes.

serve over egg noodles, mash potatoes or couscous.